
In our recent article on Practicing your Hacking skills we covered a number of packages and websites where you can legally hone your Hacking skills. Here we are going to cover installing and configuring Metasploitable together with Kali Linux as part of a Penetration Testing lab.
Virtual Box installation
Metasploitable is available as a Linux-based Virtual Machine (VM) that can run on VMWare, VirtualBox and other virtualization platforms. We are going to install the VirtualBox VM on the following Linux desktop:
- Operating System: Ubuntu 20.04.1 LTS
- Kernel: Linux 5.4.0-54-generic
- Architecture: x86-64
First download the correct VirtualBox installation file for your platform from here. For the above configuration I downloaded the latest ‘.deb’ file and via the File Explorer double-clicked on the file which opened the Ubuntu Software GUI app to do the install.
Once VirtualBox has been installed then run it by either clicking on the icon or issuing the command ‘virtualbox’ from the Command Line Interface (CLI). The VirtualBox Manager will appear:

Next we need to install the Oracle VM VirtualBox Extension Pack by downloading the file using the ‘Save’ option. Double-click the downloaded file or these carry out these steps from within VirtualBox Manager:
- Click ‘File’ -> ‘Preferences’.
- Select the ‘Extensions’ menu.
- Press the ‘+’ button, select the downloaded file, and ‘Install’ the Extension Pack.
- Click the ‘OK’ button to complete.

Metasploitable installation
Now that we have VirtualBox installed it is time to download the Metasploitable VM (approx 825 Mb) from Rapid7 from here which first requires the completion of a personal details form.
The compressed ZIP file is likely to be in the Downloads folder so extract the contents into a sub-folder from the current home folder:
unzip Downloads/metasploitable-linux-2.0.0.zip
Switch to the VirtualBox Manager and create a VM using the existing virtual hard disk file from the Metasploitable download. Click ‘Expert Mode’ and complete the following fields:
- Name = your preferred name e.g. Metasploitable 2
- Type = your platform e.g. Linux
- Version = operating system e.g. Ubuntu (64-bit)
- Memory size = ideally 4 Gb which is 4096 Mb
- Hard disk
- Click ‘Use an existing virtual hard disk file’
- Click ‘Add’
- Navigate to the folder Metasploitable was extracted into and select file ‘Metasploitable.vmdk’
- Click ‘Choose’
Once the above details have been entered click ‘Create’:

Metasploitable test
The VirtualBox Manager should now show the Metasploitable VM so fire it up via the ‘Start’ button:

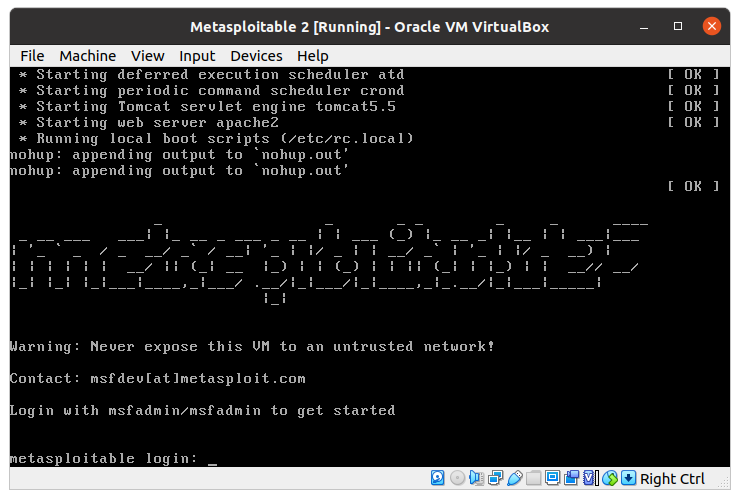
Once started you should be prompted for login credentials (msfadmin/msfadmin):
After logging-in run the ‘ifconfig’ command and note that Metasploitable is not attached to the local network but has been assigned its own IP Address e.g. 10.0.2.15. This is good because we do not want such a vulnerable machine open to being hacked from outsiders especially if the local machine is connected to a public WiFi network:

Kali Linux installation
Now that we have Metasploitable as our target machine, a Penetration Testing client is required. For the purposes of this ‘How To’ article we are going to install Kali Linux 64-bit. First download the VirtualBox VM image (approx 3.6 Gb) from the Offensive Security site.
Once downloaded switch to the VirtualBox Manager, click on ‘Tools’ then the ‘Import’ button to open the ‘Import Virtual Appliance’ screen. Click the folder icon and select the ‘.ova’ file e.g. ‘kali-linux-2020.4-vbox-amd64.ova’ which is likely in the ‘Downloads’ folder:

Note: With being in Expert mode details of the VM are shown on the right side of the screen.
After the ‘Import’ button has been clicked and the T&C’s agreed to the appliance will begin importing. Once complete the Kali Linux VM will be listed below Metasploitable.
Next we need to change a setting so highlight Kali Linux then click the ‘Settings’ button. On the ‘System’ menu change the ‘Base Memory’ to 4096 Mb then click the ‘OK’ button:

Kali Linux test
Now it is time to make sure Kali Linux runs, so in the VirtualBox Manager ensure that the correct VM is highlighted and click ‘Start’. The following login screen should be presented (username/password is ‘kali/kali’):

The screen can be resized by dragging the sides or corners with the cursor. Next open a Terminal window and issue the command ‘ifconfig’ as we did with Metasploitable.
Note: This is 10.0.2.15 as well! This is because the two VM’s are not connected to the same network and have been assigned separate IP Addresses due to there being no DHCP server.
Configuring the network
To configure a virtual network perform the following steps within the VirtualBox Manager:
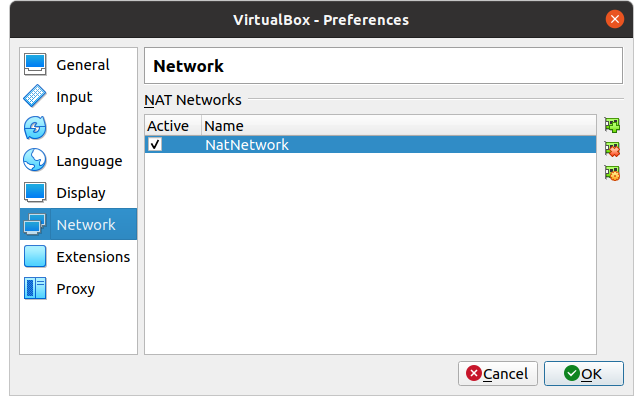
- Click ‘File’ -> ‘Preferences’.
- Select ‘Network’ menu.
- Click the ‘+’ button on the right to add a NAT Network.
- Click the ‘OK’ button.
For both the Metasploitable and Kali Linux VM’s perform the following steps:
- Ensure the VM is powered off, highlight the VM and click the ‘Settings’ button.
- Select ‘Network’ menu.
- On the ‘Adapter 1’ tab change the ‘Attached to:’ field from ‘NAT’ to ‘NAT Network’.
- The ‘Name:’ should be set to ‘NatNetwork’, if not select this from the dropdown list.
- Click the ‘OK’ button.

Log into each of the VM’s as described previously and have them running at the same time. Issue the command ‘ifconfig’ for each and they should have different IP Addresses now. Within the Kali Linux VM issue a ‘ping’ command against the IP of the Metasploitable VM:
ping 10.0.2.4

We now have a Metasploitable and Kali Linux VM on the same virtual network. In a future article we will cover some of the attacks that can be performed using this Penetration Testing lab.
Have you installed and used Metasploitable? Do you have any tips or tricks you would like to share with our readers? If so please feel free to comment below.