
Mobile devices are becoming more compact in size, have increasing power & memory, and are becoming far more affordable. The Raspberry Pi range of the products are amongst the most popular of these with a variety of options to choose from together with an expanding range of accessories.
Below are some examples of how different sets of hardware can be used in conjunction with specific software to produce truly portable Penetration Testing machines:
1) USB Pentesting platform

This is a very affordable solution which turns the entry-level Raspberry Pi device into a USB-based plugin Penetration Testing tool. It is most useful where physical access to the target computer is possible. It is also useful as a portable device that does not require its own power source as it can be powered by the USB port it is plugged into.
Items needed:
- Raspberry Pi Zero W
- USB add-on board w/ Case
- Micro SD card
- Software
Raspberry Pi Zero W
The specification is as follows:
- Processor = ARM11 @ 1 GHz
- Memory = 512 Mb
- Wireless communications = Bluetooth (802.11b/g/n), WiFi (2.4 GHz)
- Graphics display port = Mini HDMI
- Storage = Micro SD
Note: The reason for opting for the Zero W rather than the Zero model is the wireless support i.e. remote access to the device.
For further specification details on this device or to purchase for around $20 click here.
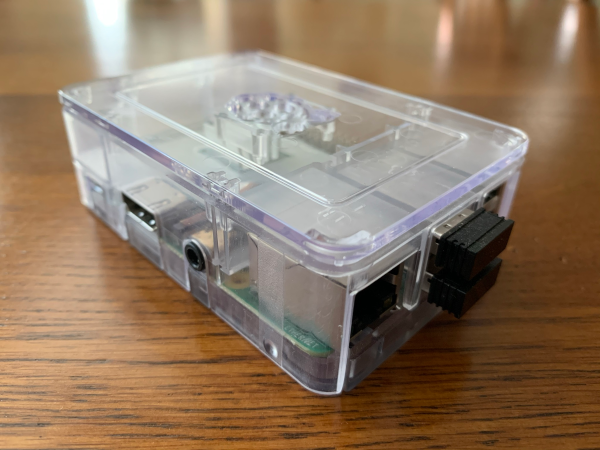
USB add-on board w/ Case
The PCB circuit board with USB connector is mounted onto the Raspberry Pi Zero W making it effectively an intelligent thumb drive. The option I have linked to in this section includes an acrylic two-part case. This protects the motherboard from catching on clothing or being subject to static shocks when touching it.
For further details or to purchase for around $9 click here.
Micro SD card
These are becoming ever cheaper with increasing capacities. The minimum to opt for is 16 Gb as the operating system together with software need to fit plus any captured data. If possible go for a bigger capacity card up to 256 Gb so more documents can be stored from the target machine or network.
In order to write the software image to the Micro SD card on your computer a full-size SD Card Adapter may be needed. Many Micro SD cards come with these including the one I have linked below.
This Micro SD card has options ranging from 32 Gb ($7.49) to 256 Gb ($27.99) and includes the SD Card Adapter – click here.
Software
P4wnP1 A.L.O.A. by MaMe82 is a framework which turns a Rapsberry Pi Zero W into a flexible, low-cost platform for pentesting, red teaming and physical engagements … or into “A Little Offensive Appliance”.
github.com/RoganDawes/P4wnP1_aloa
This is a sophistical piece of software that has many features including:
- Plug&Play USB device emulation – to get around firewalls and intrusion detection software by emulating USB Ethernet, Serial device, Mass Storage, keyboard or mouse.
- HIDScript – for automating the keyboard & mouse actions on the target machine.
- Bluetooth & WiFi support – for remote access by the Pentester.
- Networking – for configuring network connections.
- Tooling – P4wnP1 A.L.O.A. runs on top of Kali Linux so other tools are available for use.
- Remote Configuration – via CLI (Command Line Interface) or web browser.
- Automation – to automate scripts to run upon connecting to the target computer.
For further details, installation instructions, and to download the software click here.
2) Screenless Pentesting device
This is a screenless device that is remotely accessed by the Pentester over WiFi. The device can then be used for the following scenarios:
- Ethernet attack – a network is targeted by plugging the on-board Ethernet port into the network via an Ethernet cable.
- Wireless attack – a network is targeted by using a USB Wireless Adapter to capture reconnaissance traffic from WiFi networks & devices or by connecting to a specific network for exploitation.
- Access Point (AP) attack – users are targeted by simulating a public WiFi network Access Point that they can connect to.
Note: In all three of the above the Raspberry Pi device is accessed remotely by the Pentester using the on-board Wireless Adapter.
Items needed:
- Raspberry Pi Model 3 or 4
- Raspberry Pi case
- Power supply (A/C Adapter or Powerbank w/ USB cable)
- Ethernet cable (for Ethernet attack)
- USB Wireless Adapter (for Wireless & AP attacks)
- HDMI Ghost adapter (optional)
- Micro SD card
- Software
Raspberry Pi Model 3 or 4
The latest two models of the Raspberry Pi are the 3B+ and 4. If cost is a primary decision factor then go with the Model 3B+, if processing power and memory size are more important then go with the Model 4.
Model 3B+ specification:
- Processor = 64-bit quad-core @ 1.4 GHz
- Memory = 1 Gb
- Wireless communications = Bluetooth (802.11b/g/n), WiFi (2.4 & 5 GHz)
- Graphics display port = Full-size HDMI
- Storage = Micro SD
There are many additional features over the Zero W, for further specification details or to purchase @ $37 click here.
Model 4 specification:
- Processor = 64-bit quad-core @ 1.5 GHz
- Memory = 2, 4 or 8 Gb
- Wireless communications = Bluetooth (802.11b/g/n/ac), WiFi (2.4 & 5 GHz)
- Graphics display port = 2 x Micro HDMI
- Storage = Micro SD
There are many additional features over the Model 3B+, for further specification details or to purchase click 2Gb ($47), 4Gb ($58) or 8Gb ($89).
Raspberry Pi case
For the Model 3B+ there are a huge variety of cases, an example of one that includes 2 x heatsinks for the CPU and Graphics Processor costs $6.49.
The same goes for the Model 4 with this example including a cooling fan and heatsinks for $8.99.
Power supply
Here there are two main options which depend on mobility needed and duration of running the Raspberry Pi:
- A/C Adapter – here are versions that include ahandy On/Off switch:
- Powerbank – these have a trade-off on size/weight, capacity and price. Here are some examples:
Ethernet cable
The Model 3B+ has a maximum throughput of 300 Mbps whilst the Model 4 supports full Gigabit Ethernet of 1000 Mbps. The appropriate Ethernet cable to support both speeds is RJ45 Cat-6 or higher. The cost then depends on the quality and length of the cable with this example ranging from 5 feet @ $7.56 up to 50 feet @ $15.
USB Wireless Adapter
Whilst both models of the Raspberry Pi have a Wireless Adapter built-in, in order to connect remotely and then carry out WiFi attacks a second one is needed.
Many attacks require the Wireless Adapter to be put into Monitor mode rather than the default Managed mode. This is necessary to carry out Packet Injection. Additionally Linux support is needed in order to have device driver support.
Further considerations are portability versus range and support for 2.4 GHz only or dual-band (2.4 & 5 GHz). Below are two examples of Wireless Adapters:
- Compact, 2.4 GHz and limited range @ $15.99
- Non-compact, dual-band and long-range (2 x 5 dBi external antennas) @ $59.99
For further information check out our Wireless Adapters for Pentesting article.
HDMI Ghost adapter
The aim of an HDMI Ghost adapter is to simulate a display device being connected via an HDMI cable. Given this example is for a screenless device then a display will not be present. In most cases it is possible to configure Linux to be ‘headless’ but sometimes this can be problematic in which case an easy solution is to add a small HDMI Ghost adapter @ $7.99.
Micro SD card
This is the same as the option for the Raspberry Pi Zero W ranging from 32 Gb ($7.49) to 256 Gb ($27.99) and includes the SD Card Adapter – click here.
Software
There are a number of options for which operating system to Pentest with. Probably the most popular is Kali Linux – click here to download the appropriate image for your chosen Raspberry Pi device.
3) Screen-based Pentesting device
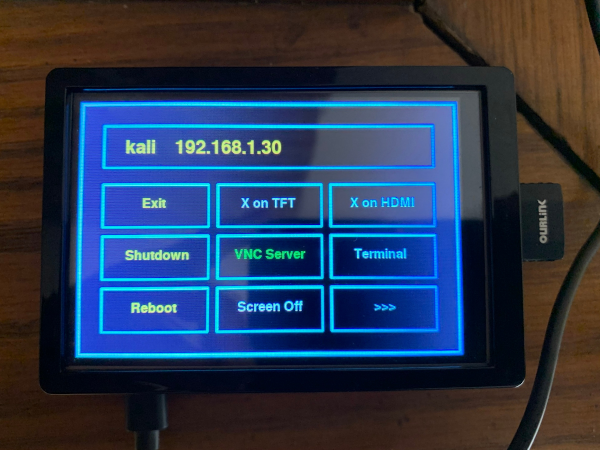
This is a device with a small attached screen that is used by the Pentester. The device can also be configured to be accessed remotely as in example 2 using the on-board Wireless Adapter. The scenarios supported are the same as described in Example 2 with the key difference being the ability to directly interact with the device.
Items needed:
- Raspberry Pi Model 3 or 4
- Raspberry Pi case w/ screen & stylus
- Power supply (A/C Adapter or Powerbank w/ USB cable)
- Ethernet cable (for Ethernet attack)
- USB Wireless Adapter (for Wireless & AP attacks)
- Wireless mini keyboard (optional)
- Micro SD card
- Software
The hardware used is mostly the same as in example 2 apart from the following:
Raspberry Pi case w/ screen & stylus
There are a variety of small screens available for the Raspberry Pi with some coming built-into the case. Here are some examples:
- Model 3B+ – 320×480 Pixels 3.5″ TFT LCD monitor. This is a touch screen and comes with a stylus. For further details or to buy @ $27.99 click here.
- Model 4 – 320×480 Pixels 3.5″ TFT LCD monitor. This is a touch screen and comes with a built-in cooling fan & stylus. For further details or to buy @ $29.99 click here.
Wireless mini keyboard
A wireless mini keyboard is a handy addition for controlling the mouse and typing commands when a Raspberry Pi is connected to a monitor, TV or built-in screen. They are chargeable and have a touchpad. Some connect via Bluetooth whilst others connect via a 2.4 GHz USB dongle. A great example of one can be found @ $14.99.
Software
There is a Linux version built specifically for Penetration Testing using a Raspberry Pi with a built-in screen such as described in this example. A great feature is that it includes a ‘touch optimised interface’ and uses Kali Linux so comes with all the bundled in tools for Ethical Hacking or Pentesting.
Visit the Sticky Fingers Kali-Pi web page for instructions and download links.
Summary
All three of the above examples provide great projects for gaining experience of using a Raspberry Pi plus building and using Kali Linux. The resulting device can be used for learning to Pentest or to carry out engagements.
Whilst the above hardware listed covers individual items, there are plenty of bundles available to save some money so check those out too.
Do you have any experience of using a Raspberry Pi as a Penetration Testing device? If so what hardware and software did you use? Please share your thoughts by commenting below.